

Atlantis Boater Setup Wizard
Set up an X4.4 lift controller in Atlantis Boater, check the saved settings, and test the lift before handing it over. The wizard follows different steps for an Atlantis Position Sensor, physical limit switches, or manual control.
Safety first
For qualified installers and service technicians
Use these instructions only if you are qualified to service this lift or are working under dealer supervision. Incorrect settings can cause unexpected movement, equipment damage, or injury. Stay beside the lift throughout setup and keep people, boats, and objects clear of its moving parts.
- Know how to stop the lift and where its breaker or emergency shut-off is before starting.
- Start with the lift stopped and every movement control released. Stop immediately if travel is backward, uneven, obstructed, or unexpected.
- This guide covers X4.4. Resolve any missing-information message in the app with Atlantis Support before setup.
Before you open the wizard
- Complete installation and identify the actual motor arrangement, position sensor or limit switches, and safe travel range. The wizard cannot check the mechanical installation for you.
- Add or accept access to the lift in Atlantis Boater, then connect directly by Bluetooth while beside it. Remote access cannot run the Setup Wizard.
- Keep the phone connected to Wi-Fi or cellular internet. Atlantis Boater must confirm Service Mode access before opening it.
- A shared or marina-assigned user needs Service Menu permission and compatible controller firmware. If access is missing, ask the owner or marina; if an update is required, have an authorized person complete it first.
Open Setup Wizard
- 1
Open Lift & Device Info
Open the correct lift, choose Open Lift Control, and tap the Lift & Device Info gear icon. This opens Device Settings. Check that the serial number belongs to the lift in front of you.
- 2
Choose Service Lift
Read the service warning and terms. Check both acknowledgements only if they apply, then choose I Understand — Enter Service Mode. Wait for the access check to finish.
- 3
Choose Setup Wizard
On the Service Mode screen, choose Setup Wizard. Check Direct Bluetooth, Controller serial, Hardware version, Lift controller firmware, App bridge firmware, and Lift motion. Resolve missing information before continuing. Lift motion must say Stopped.
- 4
Choose Begin Setup
This starts a new trip through the wizard. Some settings change as you go; there is no final button that saves everything at once.
Example screens from Atlantis Boater. Names, device details, and settings are samples.
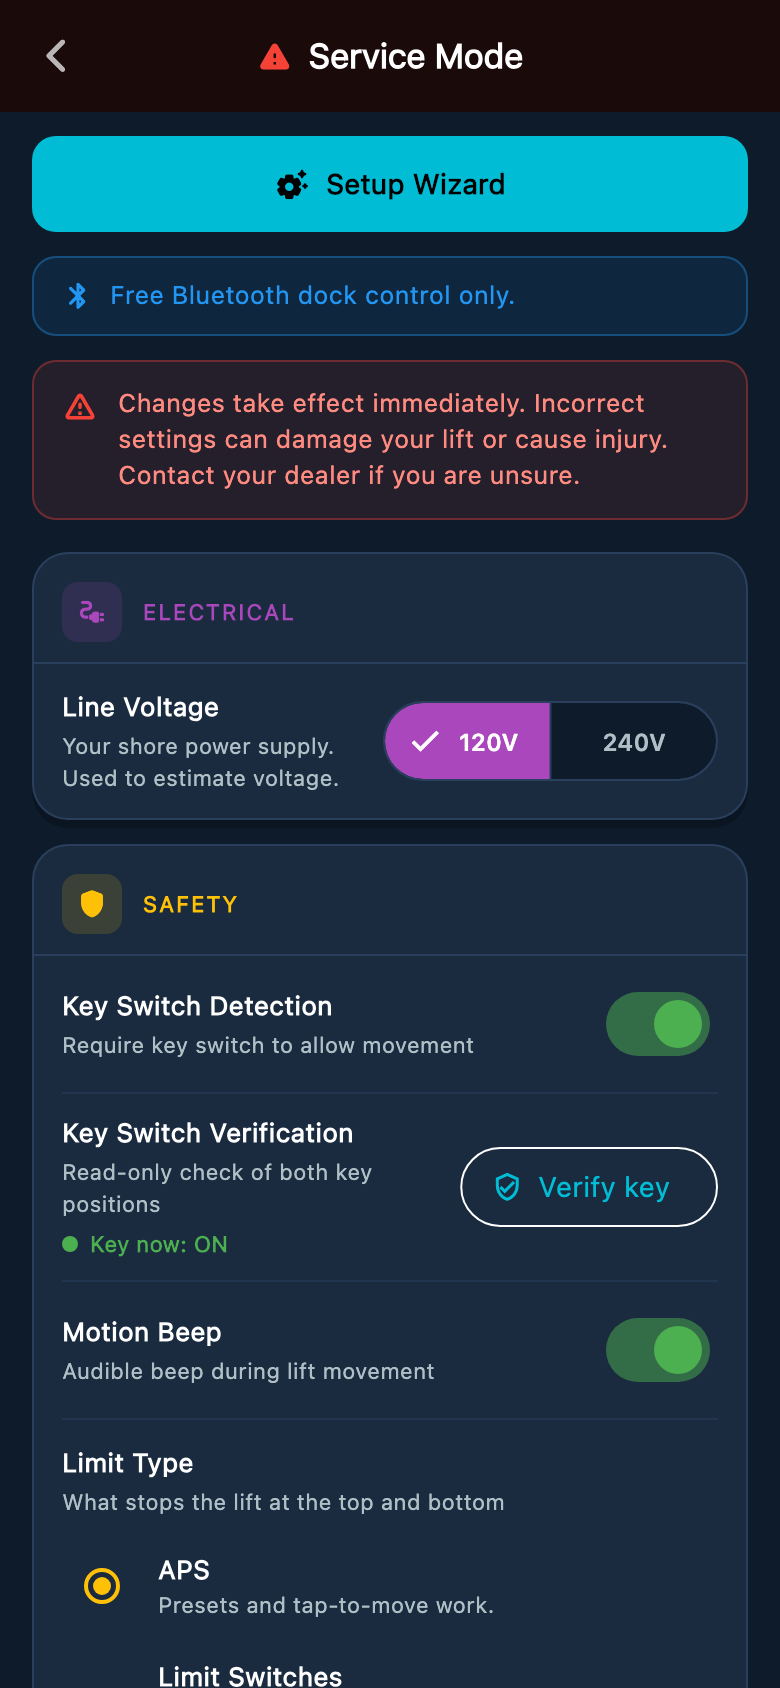
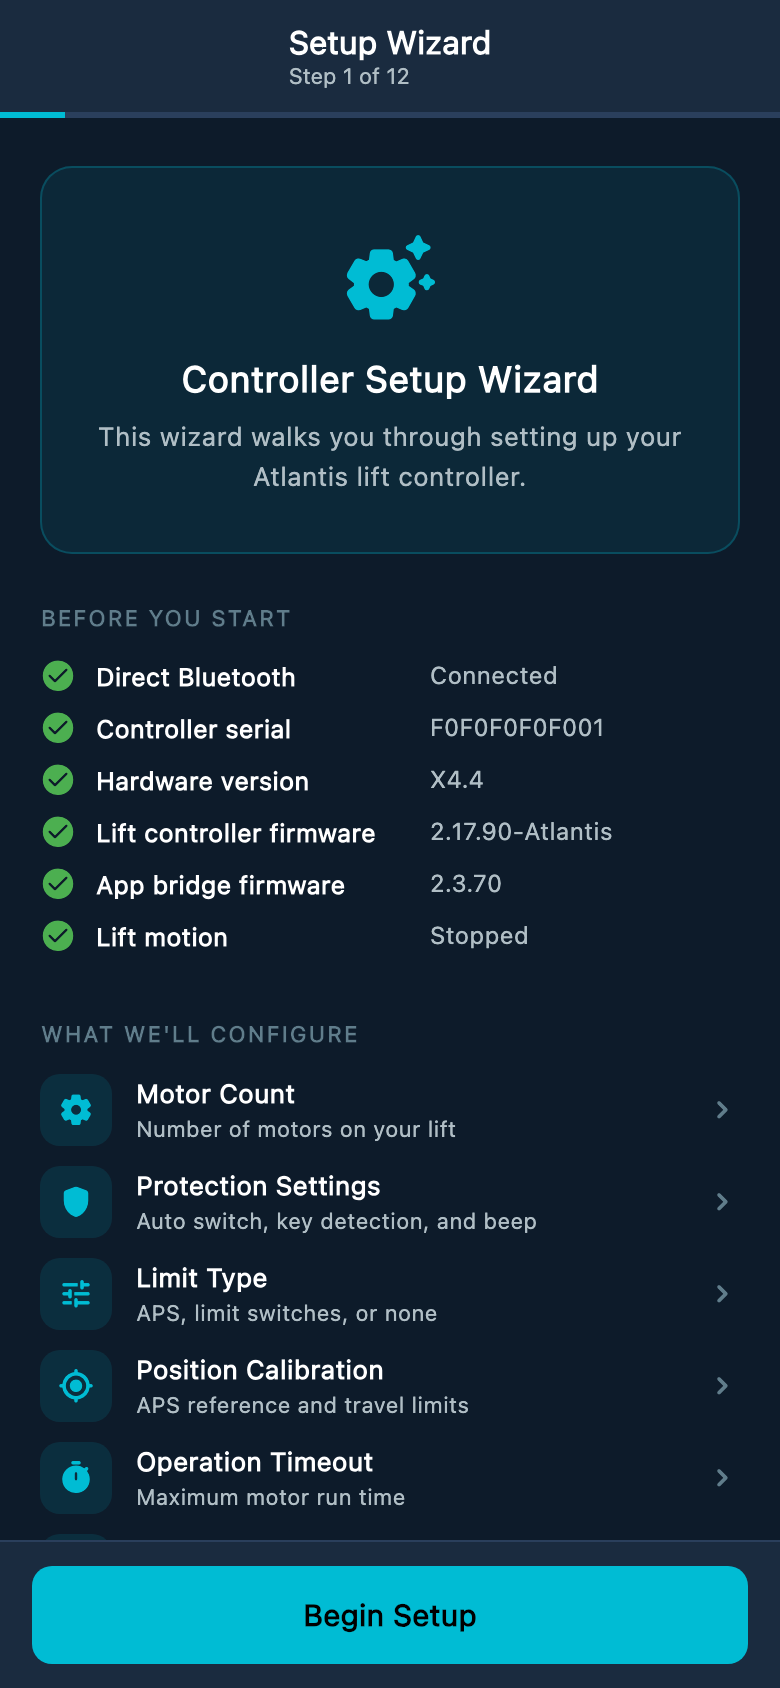
Select an image to enlarge it.
Motor Count and Protection Settings
- 1
Motor Count
Choose the motor arrangement that matches the installed controller, then Next. Atlantis Mini uses one shared motor group, so its choice stays at 1 Motor Group even when more than one physical motor runs together. The additional choices shown for Atlantis Plus apply to separately controlled motors.
- 2
Protection Settings
Each switch changes the lift as soon as you tap it. Set Auto Switch Installed to match the control box. Key Switch Detection requires the key to be on before movement; keep it configured for the installed key switch. Motion Beep controls the sound during movement. Check the settings, then Next.
Choose Limit Type
Answer “What stops this lift at the top and bottom?” using the equipment actually installed. Choose the matching option, then Next.
- 1
Atlantis Position Sensor (APS)
Use this for a lift fitted with an APS. The wizard continues through APS Hardware Zero, Set Upper Limit, Preset 1, Preset 2, and Set Lower Limit. It then opens Operation Timeout, Direction Change Delay, and Review Setup.
- 2
Limit Switches
Use this for installed top and bottom switches or a rotary limit switch. The wizard opens Physical Limits, then Operation Timeout, Direction Change Delay, and Review Setup. This option does not provide presets or tap-to-move.
- 3
None
Use this only for an installation intended for manual control without automatic top and bottom stops. Hold UP or DOWN to move; release to stop. The timeout also stops a run, but it does not know where the top or bottom is. Auto, presets, and tap-to-move are unavailable. The next screen is Operation Timeout.
Example screens from Atlantis Boater. Names, device details, and settings are samples.
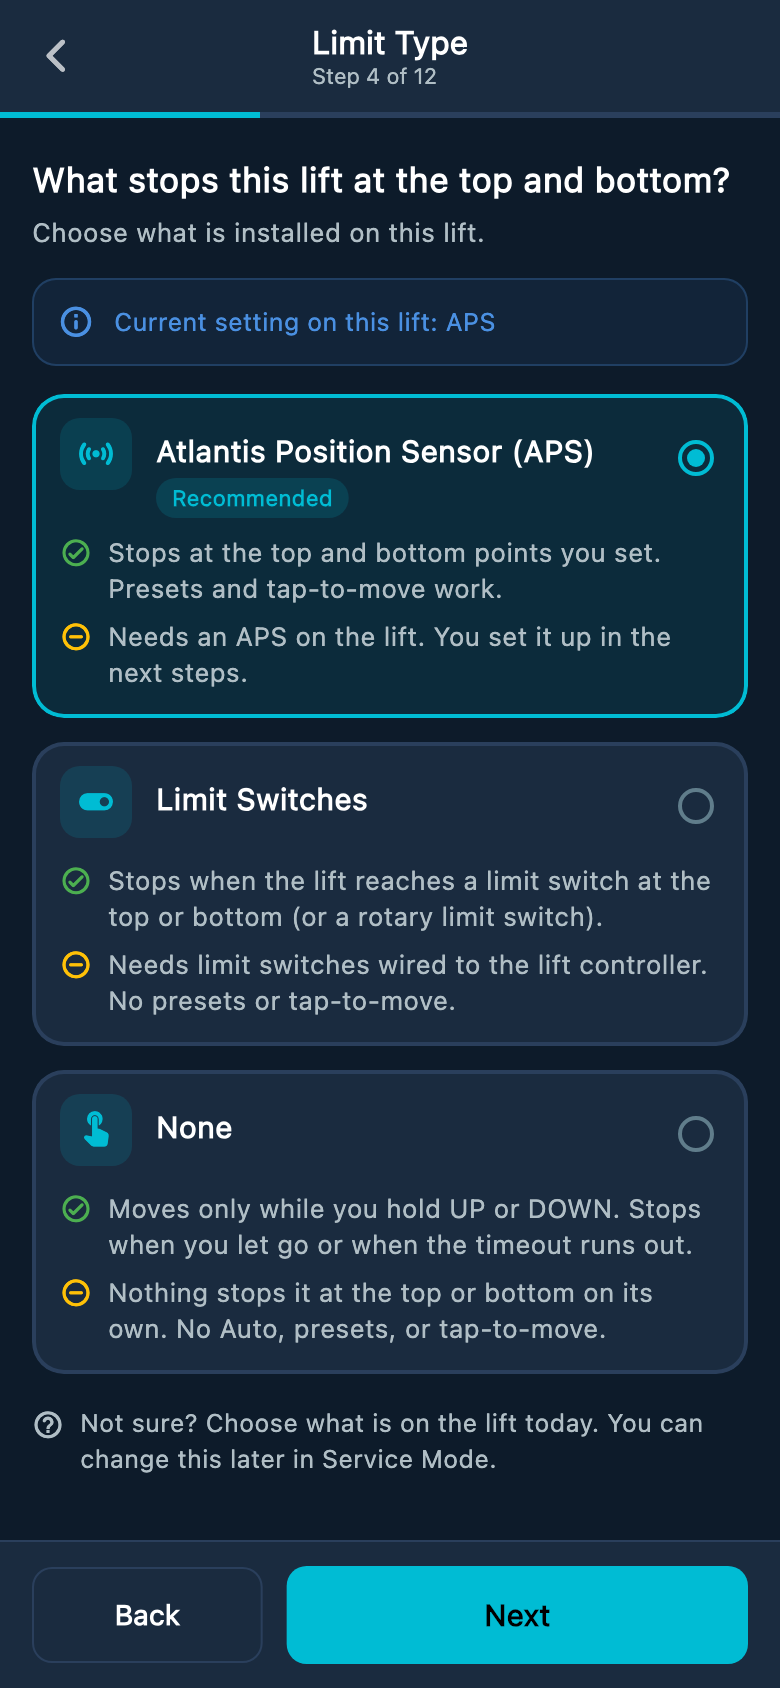
Select an image to enlarge it.
APS: Hardware Zero
Hardware Zero is the APS reference at the verified very top of travel. It is separate from the upper stopping point used during normal operation.
- 1
Start Hardware Zero Setup
Choose Start Hardware Zero Setup only when you are ready to position the lift safely. Travel limits may be paused during this setup. Watch the lift continuously and do not rely on an automatic stop.
- 2
Position the lift at the top reference
With the lift empty, hold the on-screen UP or DOWN control to position it at its physically verified top reference. Release to stop. Do not drive the mechanism into an obstruction or guess where the top is.
- 3
Set Hardware Zero and wait for confirmation
Release all movement controls and let the lift settle fully. Choose Set Hardware Zero. Continue only after the app confirms Hardware Zero is set and Next becomes available. If it was not confirmed, keep the lift stopped and follow the displayed Retry Hardware Zero instructions.
APS: Set Upper Limit
- 1
Choose Start Upper Limit Setup
Wait for setup to start. Keep the lift in sight because travel limits may be paused while you set the stop.
- 2
Position and save the normal upper stop
Hold UP or DOWN to reach the highest point the lift should use in normal operation. This point must be below the top reference. Release all controls, let the lift stop and settle, then choose Save Upper Limit.
- 3
Check the saved message
Wait for Upper limit saved before choosing Next. Skip Upper Limit keeps an existing setting; do not use it when that limit is missing, incorrect, or was cleared by a new Hardware Zero.
APS: Preset 1 and Preset 2
- 1
Choose a useful position
At Preset 1, leave Auto Mode off and use held movement on the remote or control panel to reach a position safely inside the intended travel range. These screens do not have UP and DOWN movement buttons. Watch the lift and stop it before saving.
- 2
Save the preset
Wait for all movement to end. Choose Save Preset 1, or Update Preset 1 if one is already set. Wait for the saved message and check the displayed saved position before Next. Repeat at Preset 2 using Save Preset 2 or Update Preset 2.
- 3
Skip only presets you do not need
Skip Preset 1 and Skip Preset 2 let you continue without saving a new position. A skipped preset is not a tested preset. Saving a stopped position does not require Auto mode. Leave Auto Mode off until both limits are complete and tested; turn it on only when ready to test automatic movement to the presets.
APS: Set Lower Limit
- 1
Choose Start Lower Limit Setup
Wait for setup to start. Hold UP or DOWN to reach the lowest point the lift should use in normal operation, before it travels too far. Watch it continuously while travel limits are paused.
- 2
Save and check the lower stop
Release all controls, let the lift settle, and choose Save Lower Limit. Wait for Lower limit saved, then Next. Skip Lower Limit is only for keeping an existing correct limit; it cannot finish a new or cleared APS setup.
Limit Switches: Physical Limits
This screen appears only for Limit Switches. It shows Upper Limit Switch and Lower Limit Switch as ACTIVE or NOT ACTIVE.
- 1
Check each end of travel
With AUTO off, use held movement on the remote or control panel while watching the lift. Approach the upper stop carefully and confirm Upper Limit Switch becomes ACTIVE at the correct place. Move away and confirm it clears. Repeat at the lower stop for Lower Limit Switch.
- 2
Resolve any wrong indication before Next
If a switch never activates, the wrong switch activates, both remain active, or the lift does not stop correctly, stop testing and have the installation checked. Choose Next only after both ends work correctly.
Operation Timeout
The timeout limits how long one movement can run. Set it for this lift’s normal full travel with an appropriate safety margin. Do not lengthen it to hide a jam, a slow motor, or a failed stop.
- 1
Manual
Use the Manual tab to enter a value from 10 to 1200 seconds. With the lift stopped, choose Set and wait for the controller value to confirm the change, then Next. Use this method when Auto-Test is unavailable, including None or an installation without an Auto switch.
- 2
Auto-Test
Use Auto-Test only after APS or physical limit stops work correctly. Start with the lift at the bottom, choose Start Auto-Test, and keep this screen open. Follow the on-screen instruction to press UP on the controller or remote. Watch the entire trip to the upper stop.
- 3
Check the result
Continue only when the app says the test is complete and the controller saved the measured timeout. If it stops early, loses position, or reports a direction problem, stop and correct the cause before using Retry Test or Start Auto-Test Again. A failed run is not a saved measurement.
- 4
End a test safely
Choose Exit Test and wait for confirmation that the test ended. Canceling an unfinished test restores the previous timeout. Switching to the Manual tab alone does not end a running test. To save a manual value instead, follow Stop test and set timeout? and choose Stop Test & Set only after checking the lift.
Direction Change Delay
- 1
Set the pause before reversing
Enter the delay appropriate for the installed drive system, from 0.1 to 10.0 seconds. Choose Set. This gives the mechanism time to stop before moving in the other direction.
- 2
Wait for the controller
Check Current and wait for the confirmed check mark before Next. Waiting is not a confirmation. If the attempt times out, keep the lift stopped, check the Bluetooth connection, and choose Set again. Do not finish setup without confirmation.
Review Setup
- 1
Compare the settings with the lift
Check Motor Count, Protection, Limit Type, Operation Timeout, and Direction Delay. APS also shows APS Setup and Presets; the switch path shows Physical Limits. Confirm that every displayed value matches the intended installation.
- 2
Resolve anything that needs attention
Use Edit to return to the appropriate section. Use Refresh status to request the current controller settings. Wait for All reviewed settings match the controller. For APS, Hardware Zero must be set, position must be certain, and setup must be complete.
- 3
Choose Done with the lift stopped
Done returns to Service Mode. It does not prove that the physical installation is safe or complete, and it can be available even when a review item needs attention. Do not hand over the lift until the checks below pass.
Stop, cancel, or leave setup
- Release movement controls and confirm the lift has stopped before using Back or leaving a service screen. Closing the app is not a stop procedure.
- During APS position setup, use Cancel Setup if you need to abandon that step. Wait for the controller to leave setup before going back. If cancellation is not confirmed, stay beside the stopped lift, reconnect, and follow the retry message.
- If a save is refused, release all controls and let the lift settle before trying again. Do not repeatedly retry a sensor, direction, or position fault. Correct the cause first; contact Atlantis Support if it remains unclear.
- Saved changes remain when you cancel, go back, or leave the wizard. Starting again does not restore the old settings. Recheck the live settings before resuming.
Test and hand over the lift
- 1
Check basic movement and stopping
Keep the lift clear and in sight. With AUTO off, confirm UP raises it and DOWN lowers it, and that releasing a held movement control stops it. Test the installed stop controls. Check that reversing respects the saved delay. Verify the key prevents movement when it should.
- 2
Test the installed travel protection
For APS or Limit Switches, verify the correct upper and lower stops without driving beyond the safe range. For APS, also test every preset you intend to use and supported automatic moves. For None, confirm hold-to-move operation and explain that there are no automatic top or bottom stops.
- 3
Confirm timeout protection and finish
Verify the saved timeout is appropriate and works as intended using a safe installer test. Do not disable working travel stops to force a timeout. Resolve every fault before normal use, then show the operator how to move, stop, and secure the lift and which features were installed and tested.
Was this article helpful?
Tell us whether this answered your question.