

Atlantis Boater Service Menu
Service Mode contains the installation settings and setup tools for your X4.4 lift controller. This guide explains where to find them, what each control changes, and how to finish a service session.
Before you continue
For qualified service work
- Use these tools only if you are qualified to service the lift or are working under your dealer’s supervision.
- Keep the lift in sight whenever it moves. Keep people clear, stay at the controls, and stop if movement is unexpected or a warning appears.
- Do not open the controller enclosure or change wiring as part of these app instructions. Electrical work requires qualified personnel and isolated power.
- Changing a setting can affect stopping points or allow movement. Record the current settings before changing them.
Open Service Mode
Be beside the stopped lift, connect directly by Bluetooth, and keep your phone connected to the internet. Your account must have permission to control the lift and use its service menu.
- 1
Open the lift’s settings
From My Lifts, select the lift and choose Open Lift Control. Tap the gear marked Lift & Device Info. The next screen is titled Device Settings. Check the Hardware row; these instructions cover X4.4.
- 2
Choose Service Lift
Scroll down and tap Service Lift. If the app asks for a direct Bluetooth connection, return to the lift and reconnect. If service access is missing, ask the owner or your dealer to check your permissions.
- 3
Read and accept the service warning
Read both acknowledgements. If they apply to you, check both boxes and tap I Understand — Enter Service Mode. Wait while the app checks your access. The Service Mode screen opens when that check succeeds.
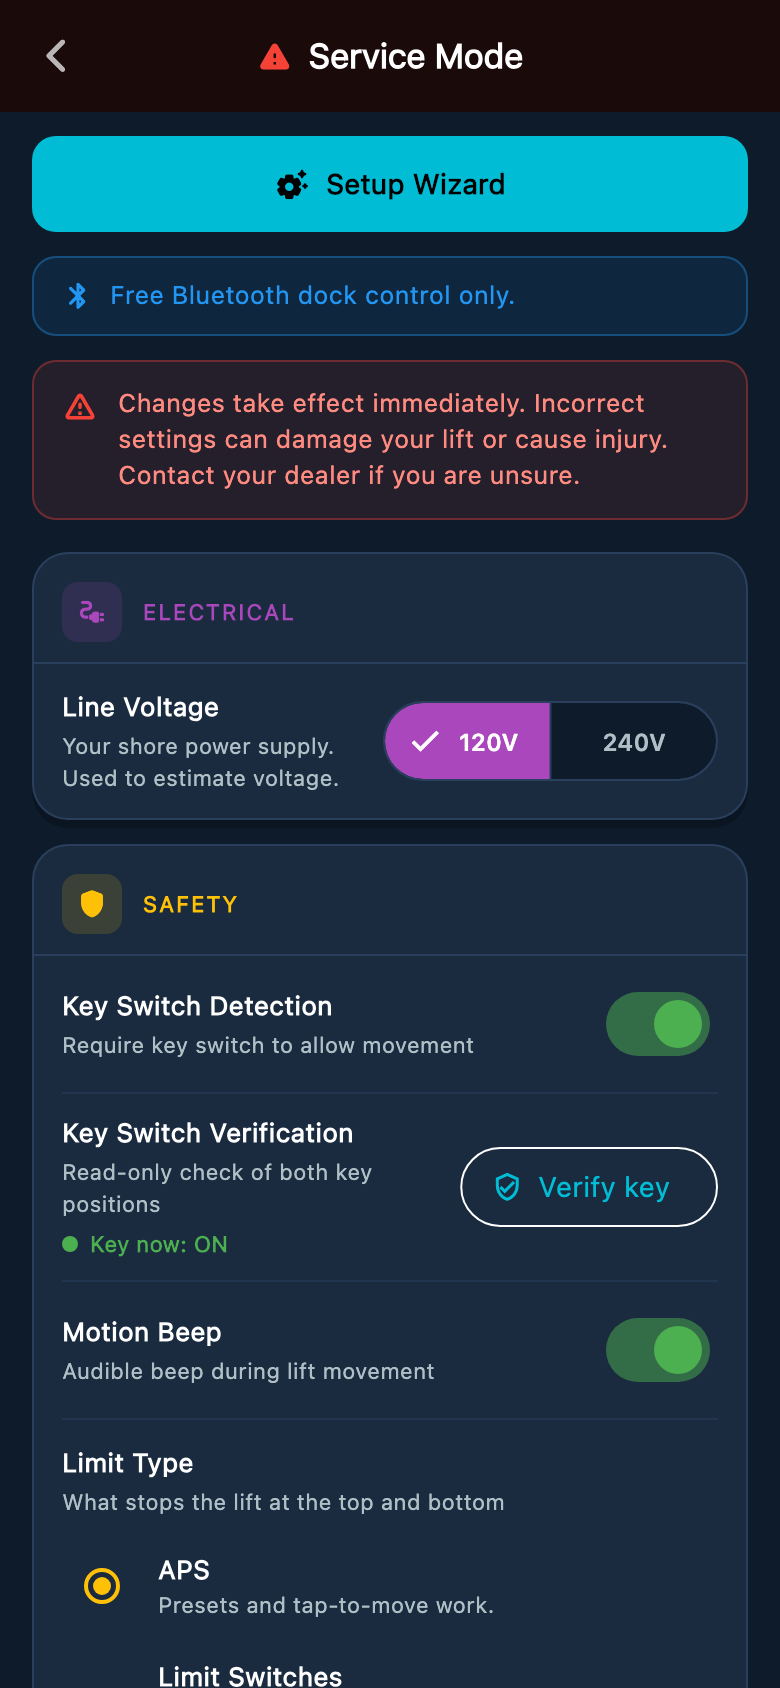
Example screens from Atlantis Boater. Names, device details, and settings are samples.
Select an image to enlarge it.
Know when a change is saved
- Switches and choices such as Line Voltage, Key Switch Detection, Motion Beep, and Limit Type send a change as soon as you tap them.
- Direction Change Delay and Operation Timeout have a Set button. Enter the value, tap Set, then check the Current value shown above the field.
- A message ending in “command sent” means the app sent your request. Check the updated setting before relying on it.
- Save Early Stop, preset Capture, and the APS setup screens wait for the controller’s reply. Read the result; if a change is not confirmed, keep the lift stopped and follow the message.
- Going back does not undo settings already saved on the lift.
Use the Setup Wizard for a full setup
Tap Setup Wizard at the top for a guided setup. It takes you through the settings that apply to the installed stopping system, then shows a Review screen.
- Use the wizard for a new installation or when several setup steps need to be checked together.
- Use the individual tools below for a specific adjustment your installer has identified.
- If the app says the hardware version is missing, contact Atlantis Support. Do not guess a hardware version to continue.
Electrical and Safety settings
- 1
Line Voltage
120V or 240V must match the actual supply verified by a qualified person. This choice does not measure, convert, or change the incoming voltage.
- 2
Key Switch Detection
Turn this on for an installation that uses the key switch to allow movement. Do not turn it off to bypass a fitted key or a failed key check.
- 3
Motion Beep
This controls the beep during lift movement. It is not a way to clear a warning.
- 4
Limit Type
Choose only what is physically installed: APS for the Atlantis Position Sensor, Limit Switches for physical upper and lower switches, or None for a deliberately specified installation without those stops. None removes the automatic top and bottom stops and requires held movement. Physical switches do not provide height presets or tap-to-move.
- 5
Auto Switch Present
Match this to whether the control panel has an Auto switch. This describes the installed equipment; it is separate from the AUTO control used during normal lift operation.
Check the key switch
Key Switch Verification checks both key positions without changing the key settings. Stop the lift and release all movement controls first.
- 1
Start the check
Tap Verify key, read the instructions in Verify Key Switch, then tap Verify key in that window. Keep the key steady in its starting position.
- 2
Follow the controller light
Cyan means hold the first position. After the short chirp, fast yellow means turn the key once to its other position. Magenta means hold it there while the second position is checked.
- 3
Wait for the result
Solid green and the full success melody mean both positions passed. Solid red and a low tone mean the check failed or was canceled. Have a failed switch checked before using the lift. Tap Done after reading the result; Done only closes the instruction window.
Motor timing
- 1
Direction Change Delay
This is the pause before the motor changes direction. Enter the installer’s chosen value from 0.1 to 10.0 seconds, tap Set, and check Current. It does not reverse the motor wiring or fix movement in the wrong direction.
- 2
Operation Timeout
This limits how long a movement can run before the controller stops it. Enter the installer’s chosen value from 10 to 1200 seconds, tap Set, and check Current. Do not lengthen it to work around a jam, slow motor, or failed stopping point.
- 3
Timeout Auto-Test
Open Test opens the guided travel test. It needs working APS or physical limit switches and automatic operation available for the installation. Follow the screen to start fully down, measure the travel, and confirm the saved result. Keep the lift in sight throughout the test. Use Exit Test if you need to cancel, and wait for confirmation before leaving the tool.
APS setup and adjustments
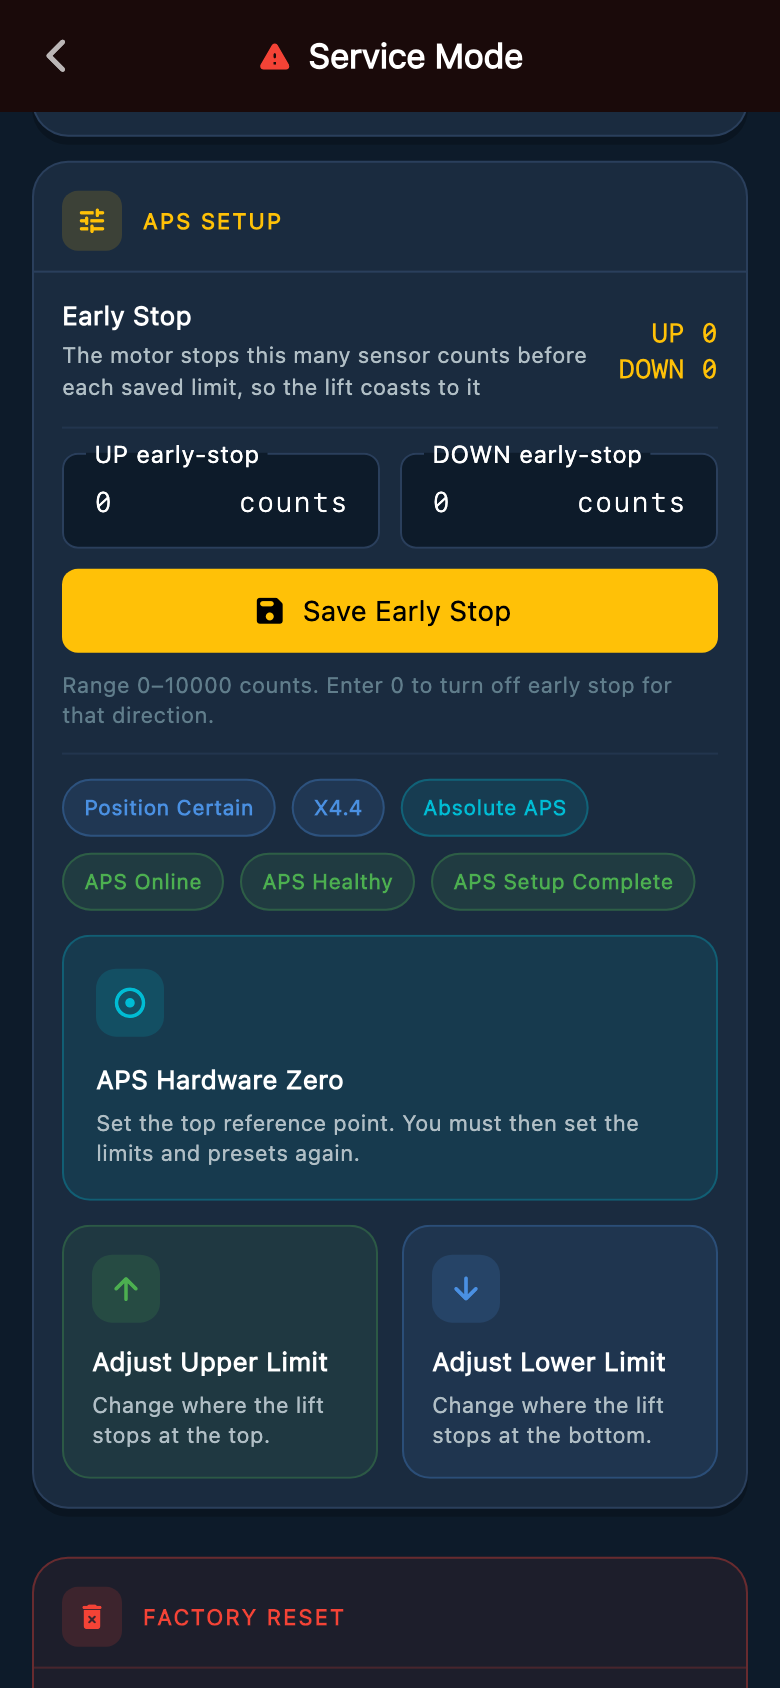
APS Setup and Position Presets appear when APS is selected and its travel range has been set up. If these tools are missing on a new installation, use Setup Wizard to complete APS setup. The tools below change the reference or stopping positions and require qualified work beside the lift.
- 1
APS Hardware Zero
Opens the top-reference setup. Changing Hardware Zero clears the old APS limits and presets. Use Setup Wizard to set both limits and recapture the presets afterward. Do not use this button just to dismiss a sensor warning.
- 2
Adjust Upper Limit or Adjust Lower Limit
Opens Set Upper Limit or Set Lower Limit. Tap Start Upper Limit Setup or Start Lower Limit Setup, then use the screen’s held movement controls to reach the installer’s safe stopping position. Release to stop, wait for a steady position, and use Save Upper Limit or Save Lower Limit. Wait for the saved result before leaving.
- 3
Early Stop
This lets the motor turn off before a saved limit so the lift can coast to the stopping point. UP early-stop and DOWN early-stop are sensor counts, not inches. Use only values established by the installer’s tests. Tap Save Early Stop and wait for both values to be confirmed, then test the stopping points safely.
Example screens from Atlantis Boater. Names, device details, and settings are samples.
Select an image to enlarge it.
Position Presets
Preset 1 and Preset 2 save useful heights on an APS-equipped lift. Set and test the lift’s limits before choosing preset heights.
- 1
Position the lift safely
Use the normal controls to reach the installer-approved height, keeping the lift in sight. Stop completely before returning to Position Presets in Service Mode.
- 2
Capture and check the saved height
Tap Capture beside the preset you want to replace. Capture saves the current height; it does not move the lift. Wait for confirmation and check the Saved at value. Test the preset from the normal lift controls while watching the lift.
Factory Reset
Factory Reset erases the controller’s setup and restarts it. Use it only when your dealer or Atlantis Support has directed a complete reset. It is not a routine fix for a connection problem or warning.
- The reset button appears only for accounts with permission. The confirmation asks you to type YES and tap RESET; Cancel leaves the setup unchanged.
- For an owner reset, the app also attempts to remove the lift from the account after the controller confirms the reset. If removal does not finish, follow the message in the app.
- If someone with shared service access resets the controller, the owner must arrange setup again. Shared access does not transfer ownership.
- The lift must be set up and its movement and stopping points tested again before normal use.
Finish and leave Service Mode
- 1
Finish the tool you opened
Stop the lift. Complete and confirm the save, or use the tool’s Cancel Setup or Exit Test action and wait until it finishes. Return to the Service Mode screen.
- 2
Use the back arrow
Tap the back arrow at the top of Service Mode to return to Device Settings and end the app’s service session. Saved changes remain on the lift.
- 3
Check normal operation
Return to the lift controls. With AUTO off, verify that held UP and DOWN move in the correct direction and stop on release. Test any changed limits or presets under the installer’s supervision before normal use.
Was this article helpful?
Tell us whether this answered your question.